实践:使用 @antfu/eslint-config 整合 ESLint 配置
简介
详情请参见源仓库文档,总的来说就是整合 ESLint 及其插件配置,开箱即用。
需要注意的是,相对于自行配置,作者按个人代码风格设置了一些默认的规则。这意味着,对于不喜欢的默认配置,你需要手动关闭或调整。
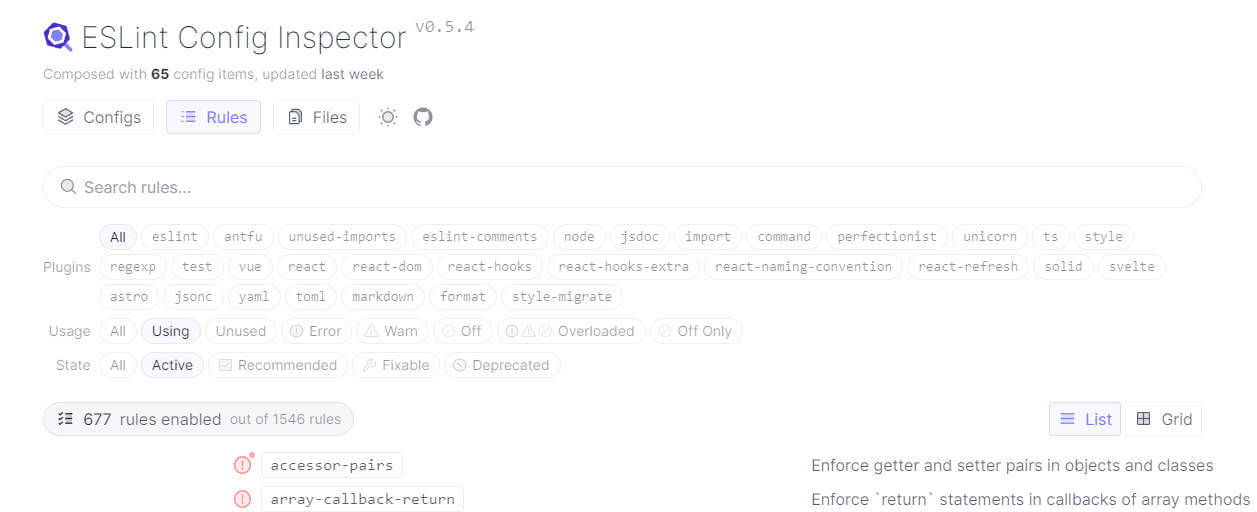
@antfu/eslint-config 汇集了 30 个插件的近 700 条规则,并提供了一个在线查看、搜索规则的工具 ESLint Config Inspector,也可以使用下面的工具安装运行在项目本地。在迁移中,对于不熟知的规则,可以在此对比并查看其对应原文档,感谢大佬!

使用工具@eslint/config-inspector本地查看项目ESLint配置及其来源,末尾有示例。
从零开始使用
在未应用格式化的项目中使用是很方便的。具体参照源仓库文档,这里仅做简要介绍
- 准备:环境 node@18+, IDE vscode
- 安装:
pnpm i -D eslint @antfu/eslint-config - 配置:创建配置文件
eslint.config.mjs(指定ES Modules时可使用命名.eslint.config.js) - 自定义配置:配置参数类型;插件重命名;规则添加、覆盖;扁平配置等
- 添加 npm 命令
- IDE Support:vscode 配置,例如,推荐插件、禁用其它格式化工具、编辑器保存时格式化等
{
  "recommendations": ["vue.volar", "dbaeumer.vscode-eslint", "antfu.unocss"]
}{
// Disable the default formatter, use eslint instead
"prettier.enable": false,
"editor.formatOnSave": false,
// Auto fix
"editor.codeActionsOnSave": {
"source.fixAll.eslint": "explicit",
"source.organizeImports": "never"
},
// Silent the stylistic rules in you IDE, but still auto fix them
"eslint.rules.customizations": [
{ "rule": "style/*", "severity": "off", "fixable": true },
{ "rule": "format/*", "severity": "off", "fixable": true },
{ "rule": "*-indent", "severity": "off", "fixable": true },
{ "rule": "*-spacing", "severity": "off", "fixable": true },
{ "rule": "*-spaces", "severity": "off", "fixable": true },
{ "rule": "*-order", "severity": "off", "fixable": true },
{ "rule": "*-dangle", "severity": "off", "fixable": true },
{ "rule": "*-newline", "severity": "off", "fixable": true },
{ "rule": "*quotes", "severity": "off", "fixable": true },
{ "rule": "*semi", "severity": "off", "fixable": true }
],
// Enable eslint for all supported languages
"eslint.validate": [
"javascript",
"javascriptreact",
"typescript",
"typescriptreact",
"vue",
"html",
"markdown",
"json",
"jsonc",
"yaml",
"toml",
"xml",
"gql",
"graphql",
"astro",
"svelte",
"css",
"less",
"scss",
"pcss",
"postcss"
]
}从 ESLint 迁移
示例:假设项目中配置了 typescript、unocss、eslint、prettier,现在将 eslint-config 迁移到 @antfu/eslint-config 下
- 首先,还是安装依赖,创建配置文件
eslint.config.js - 其次,将源格式化配置迁移到新配置文件中,移除无用插件依赖
配置可能来源于.eslintrc.js、package.json 中的 eslintConfig
移除.eslintignore,使用 @antfu/eslint-config 配置第一个参数的 ignores 替代
例如:ignores: ['dist','node_modules','public','**/*.d.ts','.eslint-config-inspector','.vscode']
移除@antfu/eslint-config整合在内的插件(例如,eslint-plugin-*)
移除eslint-define-config
@antfu/eslint-config可自动检测 ts 或手动激活 ts 检测。eslint 解析 ts 的相关插件也可以移除,@typescript-eslint/eslint-plugin, @typescript-eslint/parser
对于 prettier,可以选择弃用(antifu大佬舍弃prettier的原因在这)
使用 ESLint 就可以很好的完成代码格式化任务了。弃用 prettier 后,可移除 prettier, eslint-config-prettier
- npm 命令
{
  "scripts": {
    "lint": "eslint .",
    "lint:fix": "eslint . --fix"
  }
}指定目录的语法同 eslint,例如:eslint \"./src/**/*.{js,ts,jsx,tsx,vue,html}\"
- 最后,检测并修复
总结
请充分了解手动配置 ESLint 与@antfu/eslint-config的异同
- 插件引入
前者自行引入 ESLint,按实际需求引入插件以支持 TS,JSX/TSX,markdown 等。后者则整合封装好了,可在配置中直接激活启用。
- 默认规则
后者即便是以最小化的引入使用,提供的默认规则是作者按个人风格调整后的。这意味着你可能需要手动关掉/调整它们
code snippets
个人使用,仅供参考
@antfu/eslint-config
{
  "scripts": {
    "lint": "eslint .",
    "lint:fix": "eslint . --fix"
  },
  "devDependencies": {
    "@antfu/eslint-config": "^4.13.0",
    "eslint": "^9.38.0",
  },
}import antfu from '@antfu/eslint-config'
export default antfu({
typescript: true, // 启用 TypeScript 支持
// 你可以在这里添加或覆盖规则
rules: {
'style/comma-dangle': ['error', 'only-multiline'],
'vue/comma-dangle': ['error', 'only-multiline'],
'style/brace-style': ['error', '1tbs', { allowSingleLine: true }],
'vue/brace-style': ['error', '1tbs', { allowSingleLine: true }],
'no-case-declarations': 'warn',
'no-throw-literal': 'warn',
'vue/html-self-closing': ['warn', { html: { void: 'always' } }],
'node/prefer-global/process': ['warn', 'always'],
// 关闭规则
'eqeqeq': 'off',
'vue/eqeqeq': 'off',
'no-console': 'off',
'no-use-before-define': 'off',
'ts/no-use-before-define': 'off',
'one-var': 'off',
'antfu/if-newline': 'off',
'antfu/top-level-function': 'off',
'ts/ban-ts-comment': 'off',
'ts/no-empty-function': 'off',
'vue/attribute-hyphenation': 'off',
'vue/attributes-order': 'off',
'vue/block-order': 'off',
'vue/custom-event-name-casing': 'off',
'vue/no-reserved-component-names': 'off',
'vue/require-explicit-emits': 'off',
'regexp/no-unused-capturing-group': 'off',
'jsdoc/require-returns-description': 'off',
},
ignores: [
'.github',
'.vitepress/dist',
'.vitepress/cache',
'node_modules',
'public',
'**/*.d.ts',
'.eslint-config-inspector',
'.vscode',
'.husky',
'**/*.md'
],
}){
"recommendations": ["vue.volar", "dbaeumer.vscode-eslint", "antfu.unocss"]
}{
// Disable the default formatter, use eslint instead
"prettier.enable": false,
"editor.formatOnSave": false,
// Auto fix
"editor.codeActionsOnSave": {
"source.fixAll.eslint": "explicit",
"source.organizeImports": "never"
},
// Silent the stylistic rules in you IDE, but still auto fix them
"eslint.rules.customizations": [
{ "rule": "style/*", "severity": "off", "fixable": true },
{ "rule": "format/*", "severity": "off", "fixable": true },
{ "rule": "*-indent", "severity": "off", "fixable": true },
{ "rule": "*-spacing", "severity": "off", "fixable": true },
{ "rule": "*-spaces", "severity": "off", "fixable": true },
{ "rule": "*-order", "severity": "off", "fixable": true },
{ "rule": "*-dangle", "severity": "off", "fixable": true },
{ "rule": "*-newline", "severity": "off", "fixable": true },
{ "rule": "*quotes", "severity": "off", "fixable": true },
{ "rule": "*semi", "severity": "off", "fixable": true }
],
// Enable eslint for all supported languages
"eslint.validate": [
"javascript",
"javascriptreact",
"typescript",
"typescriptreact",
"vue",
"html",
"markdown",
"json",
"jsonc",
"yaml",
"toml",
"xml",
"gql",
"graphql",
"astro",
"svelte",
"css",
"less",
"scss",
"pcss",
"postcss"
]
}@eslint/config-inspector
不使用 @antfu/eslint-config 整合也可以使用 @eslint/config-inspector 检测项目的 eslint 相关配置情况,工具获得eslint官方推荐。
注意:v1.4.1 存在异常,跳过改版本。修复后可安装最新版本,去掉下面代码片段中的固定版本号。
配置可视化工具(@eslint/config-inspector)
- 安装,通过npx执行:
{
  "scripts": {
    "lint-inspect": "npx @eslint/[email protected]",
    "lint-inspect-build": "npx @eslint/[email protected] build && npx serve .eslint-config-inspector"
  }
}异常修复后可更改为 npx @eslint/config-inspector@latest
- 安装到项目开发依赖中:
{
  "scripts": {
    "lint-inspect": "eslint-config-inspector",
    "lint-inspect-build": "eslint-config-inspector build && npx serve .eslint-config-inspector"
  },
  "devDependencies": {
    "@eslint/config-inspector": "1.3.0"
  }
}- gitignore
build会产生静态文件到 /.eslint-config-inspector 中,注意在 .gitignore 中添加该目录